使用dotnet template快速开发Outgoing Web Hook
在上一篇文章中,我们一步步从无到有在Microsoft Teams中开发了一个简单的Outgoing Webhook,并和我们本地的Web API应用程序产生交互,总结起来的步骤大概如下:
- 导航到“团队” Tab页, 选中需要建立的Channel, 选中“应用”这个Tab,点击最下方的“创建传出webhook”
- 开发传出webhook的后端服务
- 配置ngrok进行请求转发
- Team中发送消息,后端程序响应消息
这篇文章我们一起来看看如何使用dotnet的模板来快速开发一个带安全验证机制的Outgoing Webhook
1. 运行ngrok,记下转发的地址
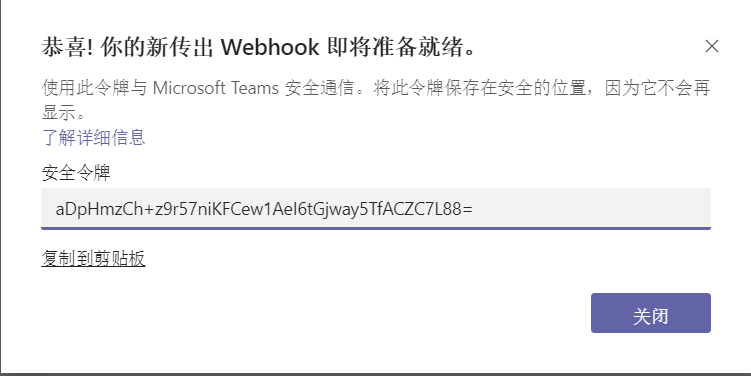
2. 在teams里新建一个app,这次记下security token
具体的创建步骤见第一篇文章
3. 安装dotnet的模板
因为Teams的模板默认没有安装,所以我们需要在dotnet里添加模板
c:\demo> dotnet new -i MicrosoftTeams.Templates
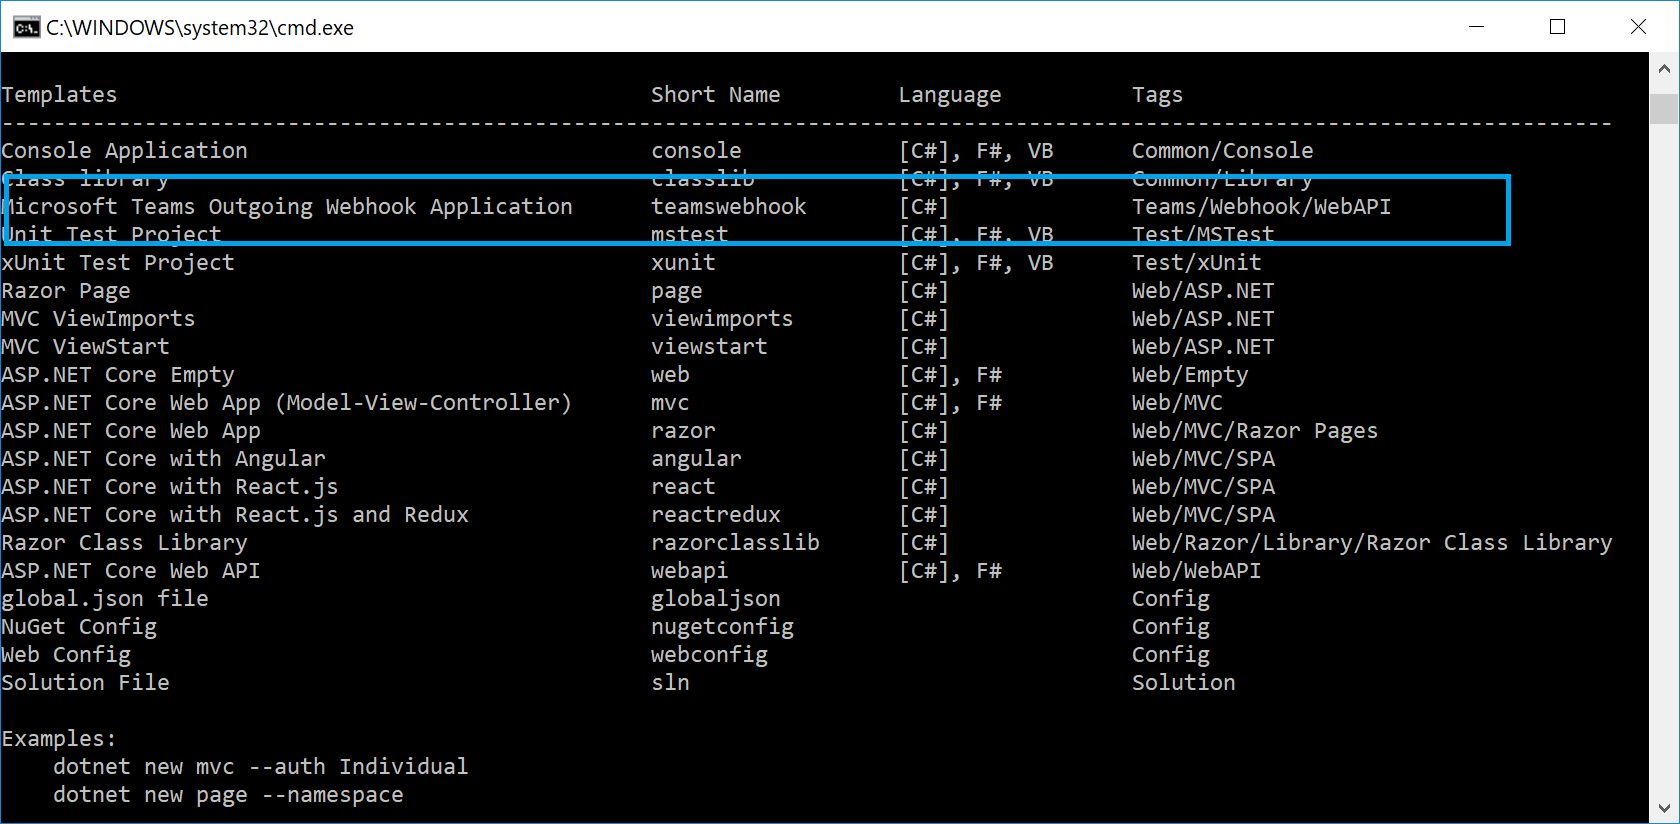
4. 使用模板创建Teams Outgoing Webhook项目
运行以下命令来在当前目录下创建工程
c:\demo> dotnet new teamswebhook
使用VS code打开这个目录,找到appsettings.cs文件,修改配置节点TeamsAppSecurityToken, 填入我们创建Webhook时生成的security token
{
  "Logging": {
    "LogLevel": {
      "Default": "Warning"
    }
  },
  "AllowedHosts": "*",
  "TeamsAppSecurityToken": "aDpHmzCh+z9r57niKFCew1AeI6tGjway5TfACZC7L88="
}
5. 运行程序
c:\demo> dotnet run
返回到Teams的对话框中,我们发送一条消息,观察Teams的消息返回
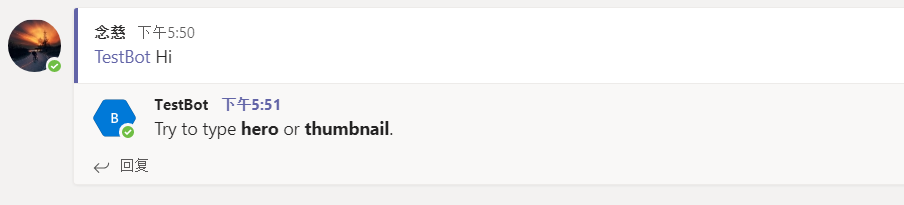
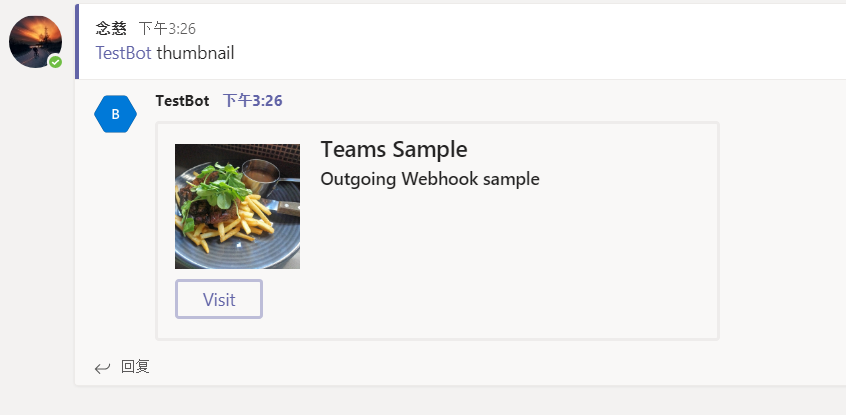
注意到消息正常返回,且提示我们尝试输入hero 或者 thumbnail,那我们根据提示,分别发送hero和thumbnail
上面的整个过程就是我们基于Microsoft Teams的模板创建的整个可交互的Outgoing Webhook的应用,下面我们来分析下整个的代码结构:
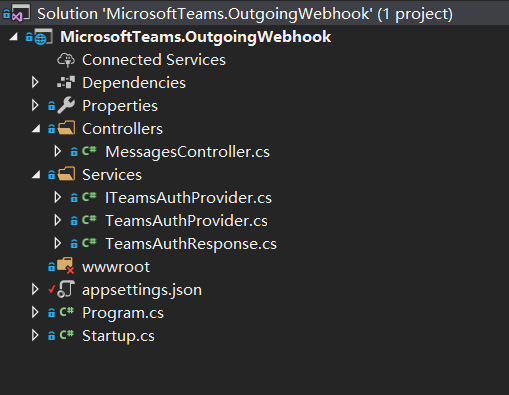
首先,看到Services中定义的接口ITeamsAuthProvider.cs:
public interface ITeamsAuthProvider
{
    /// <summary>
    /// Validates the specified authentication header value.
    /// </summary>
    /// <param name="request">The HTTP request message.</param>
    /// <returns>
    /// Response containing result of validation.
    /// </returns>
    TeamsAuthResponse Validate(HttpRequest request);
}
其中的Validate方法用于对请求的授权认证,TeamsAuthProvider.cs继承ITeamsAuthProvider,实现了Validate
的认证授权逻辑。这个验证用来确保这个请求是从微软Teams的服务器发过来的,而不是其他恶意的程序发送的请求,从而确保的请求的发起源是受信任的。
接着看下MessagesController中,GetMessage这个Action,首先实现对请求授权的判断,
var authResult = _teamsAuth.Validate(this.Request);
if (!authResult.AuthSuccessful)
{
    return new Activity()
    {
        Text = "You are not authorized to call into this end point."
    };
}
重点我们看下下面这段代码,
Attachment attachment = null;
if (activity.Text.Contains("hero", StringComparison.InvariantCultureIgnoreCase))
{
    var card = CreateSampleHeroCard();
    attachment = new Attachment()
    {
        ContentType = HeroCard.ContentType,
        Content = card
    };
}
else if (activity.Text.Contains("thumbnail", StringComparison.InvariantCultureIgnoreCase))
{
    var card = CreateSampleThumbnailCard();
    attachment = new Attachment()
    {
        ContentType = ThumbnailCard.ContentType,
        Content = card
    };
}
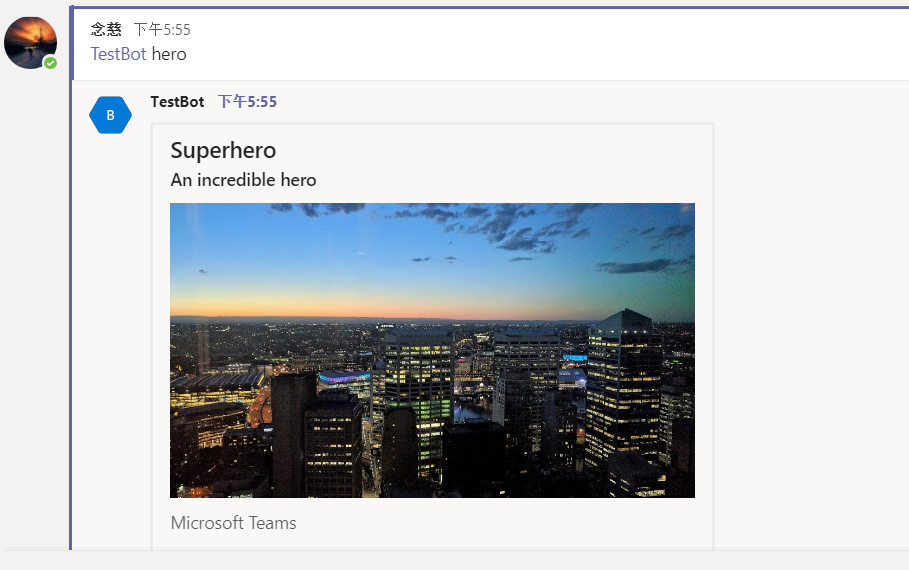
从上面的代码中看到,我们在Teams中发送hero或者thumbnail时,会看到响应的消息是一个带有图片的消息回复,具体的这种图片消息,
我们可以简单理解为是一种图片附件的形式,我们来分析其中hero图片附件的代码:
private HeroCard CreateSampleHeroCard()
{
    return new HeroCard()
    {
        Title = "Superhero",
        Subtitle = "An incredible hero",
        Text = "Microsoft Teams",
        Images = new List<CardImage>()
        {
            new CardImage()
            {
                Url = "https://github.com/tony-xia/microsoft-teams-templates/raw/master/images/cbd_after_sunset.jpg"
            }
        },
        Buttons = new List<CardAction>()
        {
            new CardAction()
            {
                Type = "openUrl",
                Title = "Visit",
                Value = "http://www.microsoft.com"
            }
        }
    };
}
可以比较清楚的看到,一些标题Title和显示问题Text, 其中Image作为显示图片URL, 这里的Buttons是这一种行为,当我们点击时,跳转到对应设置的网站,点击可以看到跳转到微软的官网。
可以看到使用dotnet template来创建outgooing webhook项目方便快速,而且使用了card,使得返回的消息格式非常丰富。